Hexagon Twinkle
Table Runner
Hexagon Twinkle
Table Runner
Hexagon Twinkle
Table Runner
Hexagon Twinkle
Table Runner
Hexagon Twinkle
Table Runner
Hexagon Twinkle
Table Runner
Hexagon Twinkle
Table Runner
OMBRE BLOSSOMS
Search Results
362 items found for ""
- You Appliqued What On Your Quilt?!
I had another hair-brained idea to use sliver strips and scraps. I thought it would be fun to create a “canvas” for a new out-of-the-box applique idea and make a quick Thanksgiving table runner. I gathered up a bunch of rust and plum fabrics, these are mostly small amounts left over from other projects. I cut random-sized strips ranging from 1¼” wide to 2” wide, all of them WOF or selvage to selvage. I opened the strips to a single layer and cut the right end off at a 60-degree angle using the Creative Grids Large 60-degree Diamond Ruler. I staggered the ends, as shown, and pieced two strip sets together with as many strips as it took to get the whole strip set to measure 8½” wide. Using the triangle lines on the ruler, align the bottom edge of the strip set with the 8½” dashed line and the flat tip of the ruler with the top edge of the strip. Cut the first 8½” triangle like this, then rotate the ruler 180 degrees to make the next cut. You should get eight triangle cuts from each strip set for a total of sixteen (you will only need 14). Arrange the triangle cuts, as shown, with six in the middle creating a complete hexagon, and each end being made up of four more. The random size of the strips gives the table runner an improv scrappy look without fussing about matching seams. Sew the triangles together into two rows: a top row, and a bottom row. Then, sew one final seam down the middle. Press all seams open for the flattest results. Okay, now for the crazy part. I bought a few spriggs of those fake silk flowers with pretty fall-looking leaves on the stems. I peeled the leaves off their plastic stems and pressed them out flat. You have to use a steam iron so the leaves won’t melt or shrivel. Off to the longarm! I quilted up the table runner using my favorite ¼” lines and scattered the freshly pressed leaves around to give it a tossed random look. You could use a strip or two of Steam a Seam to hold each leaf in place, or even a little spray baste would work great to keep things from moving too much during quilting. I thought I'd just wing it and hold each leaf in place with my fingers as I quilted them down. It worked surprisingly well on my longarm, but I think it would be a lot harder on a domestic machine. I stitched down all the little vein lines and then around the whole outside of each leaf. What a cool look! I had no idea these leaves would be so easy to appliqué. I got a little carried away with the leaf buying, so I went out and found a nice woven fall plaid fabric to use up the rest of the leaves. I placed all the leaves down the middle, overlapping them a bit to give it a garland look. In no time, I had two Thanksgiving table runners and the second one took one-tenth the time! Haha! So if you need something super fast, do this version! I just love how they came out. This idea would also make a cute Christmas table runner with holly leaves and poinsettias. Happy Sunday everyone, Krista Follow all my quilty adventures on Instagram, Facebook, and Pinterest. Visit my YouTube channel for free tutorials and tips. If you like my patterns, you can buy them on Etsy, and here on the website.
- Quilted in Honor!
This month, we remember and honor those who served. Once called Armistice Day for the ceasefire of the First World War, Veterans Day is recognized in the USA and Remembrance Day in the Commonwealth countries on November 11th. One way to show honor for the courage and sacrifice of our veterans is with a very special handmade quilt. Quilts of honor, or valor, have become symbols of gratitude and remembrance to those who served, often risking their lives to defend our lives and freedom. Remembrance Day Quilts These quilts were made in honor of Remembrance Day. This gorgeous red poppy Anzac quilt has its roots in the Australian and New Zealand Army Corps who served during WW1. Inspired by the poem, In Flanders Field, the red poppy is one of the most recognized symbols of remembrance of soldiers who died in conflict. This Remember quilt, set against a stunning blue background, honors the fallen in stars and poppies. Pam Bono's Quilt of Remembrance, with green leaves and red poppies, was officially recognized as Canada's quilt for Remembrance Day. Quilts of Valor Quilts of Valor seeks to Service Members and Veterans touched by war with comforting and healing Quilts of Valor. Quilts are made by volunteers who want to show appreciation and thank those who gave us so much. They incorporate symbols like eagles and flags in the quilts to show patriotism, national pride, and honor. Colors and patterns they choose have significance: red for courage and sacrifice, white for purity and innocence, and blue for dedication and loyalty. Quilt patterns like the Log Cabin or Star of Bethlehem represent home, hope and faith. And, every quilt tells a story. Five veterans, from Blue Ridge, NC, with service as early as 1944 were honored with special quilts. The mission of Quilts of Valor is to wrap service members and veterans touched by war with comforting and healing quilts of valor. "The quilters think of how the veterans protect their freedom while they are making the quilts." The veterans are wrapped in a quilty hug. I think they like their quilts a lot. Look at those happy faces! Quilts of Honor Quilts of Honor's mission is to bestow a universal symbol and token of thanks, solace, and remembrance to those who serve in harm’s way to protect and defend our lives and freedoms. What better way to do that than a personal handmade quilt. When Retired Army Master Sgt. Carl "Eddie" Courtney returned to the United States from Vietnam, in 1970, he was verbally and physically abused. He bought a sewing machine and started his own chapter of Quilts of Honor so that another veteran would never feel unappreciated. Quilts of Honor make custom-made quilts for military veterans. He calls them, Hugs of Gratitude. Eddie says, "No person, especially a veteran, should have that happen to them. I'm grateful to be doing this. It's almost like prayer." Honored for their Service The stories represented in these honor quilts are truly amazing! These three men represent so many who have served. Bill "Sweet William" Amberson (pictured center) is a 92-year-old World War II veteran who has never received a quilt of valor. He still carries injuries sustained in Germany as a 20-year old infantryman. Jan Bynum made Bill's quilt. Her brother was killed in Vietnam in 1968. Adding her brother's initials to the quilt, she said " I do this to honor him." She also quilted, "In valor there is hope." Vietnam veteran, Lance Wilson (pictured right) received a quilt made by his wife, Nancy. Wilson served on ships for two years in support of the war. He said, "No one has ever honored the Vietnam veterans that much. It's the forgotten war. I think it should be done a lot more." Edward Erb (pictured left) is a retired Army Ranger, served from 1975 to 1996 deploying four times to Operation Iraqi Freedom as a contractor installing surveillance systems at Army posts and forward operating bases. He said the quilt has great meaning for him because someone outside of the military wants to understand and recognize what veterans have gone through. The Veteran's Quilt Project, Tulalip, WA These are the generous quilting volunteers and the well-deserving recipients of these quilts of valor: Candy Hill-Wells/Raymond Fryberg, Marine Veteran; Sara Andres/Joseph Jones, Marine Veteran; Rae Anne Gobin/Gary Holding, Navy Veteran; Sheila Hillaire/Mel Sheldon Jr., Army Veteran; Benita Rosen/Larry Wooster, Air Force Veteran; Sonia Sohappy/Steve Gobin, Navy Veteran; Sherry Dick/Guy Madison, Marine Veteran; Lena Jones/Daniel Moses Sr., Army Veteran. The Veterans Quilt Project, for the Tulalip Veterans, was founded in 2016. Each year, the members decide on a pattern and make one quilt for each veteran honoring the service of men and women in all branches of the military. The eagle represents strength and power. Rae Anne Gobin, quilter and project founder said: "We hope each recipient finds the quilt comforting. We know our veterans put their lives on hold while serving, and helped protect us to keep our freedom. " Honoring Dad I really love this story! Cathy is on the Accounting Team at Fat Quarter Shop. She wanted to honor her Dad for all his years of military service. She sewed the Night and Day Quilt as a tribute to her Dad. This is the very first quilt she has completed. The pictures of her family and her Father's military career are just fantastic! He retired in 1985 as a Major, and then returned to school to get his teaching degree. I hope you'll take the time to read their story. Scott's Victory Quilt Pam Neill of Kentucky, actively supported her son's service while he was in the US Army Special Forces in Afghanistan in 2001. She made a quilt for him, nicknamed Scott's Victory Quilt, adding one square for every day he was gone, using a quilt as you go method. Family and friends wrote messages on the blocks. The quilt provided comfort during a difficult time for this family. (Click on the link, Scott's Victory Quilt, and page down to read her story and watch the video.) It would be great if we could honor everyone who has served, their stories are worth remembering. They shall grow not old, as we that are left grow old: Age shall not weary them, nor the years condemn. At the going down of the sun and in the morning We will remember them. For the Fallen, Laurence Binyon, 1914 I hope you enjoyed this small tribute to our veterans. The quilts may outlive them, but their service will never be forgotten. This blog was written and compiled by our resident historian :) Crystal King PS: You can read more about these honored veterans and their special quilts by clicking on the links in each paragraph. Happy Sunday everyone, Krista Follow all my quilty adventures on Instagram, Facebook, and Pinterest. Visit my YouTube channel for free tutorials and tips. If you like my patterns, you can buy them on Etsy, and here on the website.
- Sewing with Metallic Thread
Metallic thread can glitz up the simplest project in a fast way. It’s fun to use as topstitching or embellishment, and if you do free motion quilting on your domestic machine you can quilt out different decorative designs that are functional and pretty to look at! Maybe a glittery black spider web stitched into a set of placemats, or adorn a stocking with shimmery holly! There are a few things about using metallic thread you need to know before starting for the most successful project. Always mount metallic thread on the upright spool holder. This way, the thread unwinds off the side and the spool itself does the spinning. If you mount the thread on the horizontal spindle, the thread will spin off the spool and either wind itself up tighter, twisting until it breaks, or unwind separating the threads until it shreds. This is the most common problem people have with metallic thread, but the cause isn't immediately obvious because of the way the spool is positioned. Lower your top tension to almost zero. You really don’t want to put any extra pressure on this thread; it’s a bit like tinsel and can be stretched into a mess. Make sure to wind your bobbin with a matching color of regular thread. Use a metallic needle. Metallic needles have a large eye for easy threading and they punch a slightly larger hole through the fabric. They also have a larger groove in the front of the needle for the thread to channel in for protection during stitching. I tried a triple straight stitch, with the green metallic thread, thinking it would be cute to cross-hatch something in a showy way. I had to stitch slower than just doing a single stitch, but I think this idea has potential too! Well, there you go :) Another idea to add to your bag of tricks. I’d love to know if you try it! Happy Sunday, everyone! Krista Follow all my quilty adventures on Instagram, Facebook, and Pinterest. Visit my YouTube channel for free tutorials and tips. If you like my patterns, you can buy them on Etsy, and here on the website.
- The Box Bottom Bag!
I bet you can’t make just one ; I've made so many little box-bottom bags for all sorts of people and projects (they make great bridesmaids' gifts, or you can give them to all your quilt retreat buddies). I found a use for more scraps and orphan blocks! Haha, they never end! I pieced together several little odds and ends, until I had a panel about 10½” x 18½” (you can make these any size). I added a backing, and batting, and stitched my standard ¼” lines across the whole thing. In a previous post, I shared my zipper technique for "How to do Zippers". I prepared my zipper the same way and stitched it to the two 10½” top edges, to join them together, making my quilted panel into a loop. I decided to bind off the edges of the zipper to give it a fun finished look. I cut two strips 1½” x 10½” and pressed the long edge down ⅜”. I stitched the raw edge down, on the inside of the bag/under side of the zipper along the edge, and wrapped it around to the other side of the zipper. Then, I topstitched it into place. This wrapped the edge of the zipper and the raw edge of the quilted panel to finish it off nicely. I clipped down the two sides and stitched ¼” from the edge backstitching at the top and bottom. I folded the bound zipper edges down and stitched them into the side seams, backstitching well. I was going to bind the two side seams the same way. I bound the zipper edges, but things got a little bulky so I opted for a tight zigzag stitch instead. Press a good crease along the bottom fold. This will help keep things square when you pinch the corner and bring the side seam to that crease. Pin the corner, where the side seam matches the bottom crease, about 2” from the outside point to the pin. You can make a shallower or deeper pinch depending on how wide you want the box base to be. This box base will be about 3½” across with a 2” pinch on each side Use a small straight-edge ruler, and marking pin, to draw a temporary sewing line from edge to edge. Stitch all the way across, backstitching well at both the stop and start. Here it is with its “wings”. Use a needle and thread to sew several hand-tacking stitches in the side seam and point of the flaps to hold them to the side seams. This way, they will stand up on the inside walls of the bag once it's turned right side out. Turn it right side out and give it a good press. This will help crease the edges giving it a real boxy look. I cut a narrow length of leather to use as a zipper pull. And, here it is! A new box bottom zipper bag, ready for all my treasures :) Happy Sunday everyone, Krista Follow all my quilty adventures on Instagram, Facebook, and Pinterest. Visit my YouTube channel for free tutorials and tips. If you like my patterns, you can buy them on Etsy, and here on the website.
- Lighting, Shading and Color Placement
I shared in past posts how I picked my color palettes for each quilt. I get asked about that often, and it’s fun to share my inspiration boards. Color placement is another part of color that I don't talk about much. Why do I put the colors where I do within each quilt? It’s all about lighting! I use a lot of inspiration pics from nature to solidify my color choices, but I also try to mimic the way sunlight plays into these natural landscapes to capture some of their essence. The way sunlight streams through the trees creates a bright spot in the leafy canopy…. This was the inspiration for using an ombre fabric as my background in my latest pattern, Fall Foliage. I figured if I could create a light spot in the background, as the leaves tumbled down, I could capture that warm fall afternoon sunlight vibe. Here you see my lighting inspiration pics for my Entangled Sky pattern. I used these same pics as my color inspiration, but it's the way light is used that makes the three-dimensional structure pop. Imagine the light source coming from one direction, as in a sunset, making it easier to narrow down color placement to get a dynamic effect. When picking fabrics, this idea helped me pick a definite light, medium, and dark shade in each color. Once I had built the blocks, it was the inspiration pics that helped me decide how to layer the colors. I was going for a latticework of clouds over a fading blue sky kind of look. Happy Sunday everyone, Krista Follow all my quilty adventures on Instagram, Facebook, and Pinterest. Visit my YouTube channel for free tutorials and tips. If you like my patterns, you can buy them on Etsy, and here on the website.
- Orphaned No More!
I started a project this summer to combine a couple of sewing spaces into one. This turned into quite the project, organizing my scraps into color-coordinated piles and figuring out a way to store them where I wouldn’t lose track of what I had. Well, you wouldn’t believe what I found stashed here and there among my sewing stuff! I must have had an orphaned block or two from every quilt or demo I have done for the last five-plus years. I began to lay them all out. As I found them, the ideas started to flood in. These blocks weren’t all the same size, but I figured if I could get them to a common size I could make the mother of all scrap quilts! Haha! I went to the design wall and began to “build”. I decided on an 8½” diamond as my common size, meaning I could use two 8½” triangles to fill up the same amount of space. I thought a color graduating layout would allow for some oddball different shades as I worked with what I had. In some cases, I sewed the smallest units together to build bigger units and then added a random black and white stripe or other graphic print to fill where needed. I could have just sewed more of the same color in these areas, but there’s something fun and unexpected about adding these stripes. And in a way, it pulled all those crazy blocks together with a little bit of a common theme. The colors came together, and I just worked on it as I had time. It was on the design wall for a little while, and every time I walked by I would grab more pieces and arrange another block worth of scraps. I have to admit it did start to get exciting once the colors were all laid out. I was on a mission to use every last scrap…. Haha, dream on! Once I had all the blocks formed, I trimmed everything up to 8½” diamond by using my Large 60-Degree Diamond Ruler. Most of them were already about that size with an odd strip hanging out here or there. I sewed the blocks to each other in diagonal rows. I pressed the seams between blocks open, to make for less bulk in the intersections, and sewed the rows together into two halves. Then, I sewed the final diagonal seam to join the two sides and it was done! But wait, there’s more! Of course, I had a million flannel scraps and strips from other backings. I decided to just sew a bunch of those together for the back. I pressed the seams open between each of these strips to disperse the bulk. I quilted it up with my go-to straight lines, meandering back and forth, to fill up the diamond shapes and it looks quite cool from the back. I added a striped binding to cap it all off. Now, I am the happy owner of the mother of all scrap quilts! Boy, is it a happy quilt too! Just look at all those colors. It’s fun to think back on the quilts they came from and projects that have come and gone. This quilt tells a story! I was also thinking this process can be done with any shape. I can see adding square blocks together, or squares and rectangles into a common size. You could make your colors shade or work them into big block units and then put those together… the possibilities are endless 🙂 Happy Sunday everyone, Krista Follow all my quilty adventures on Instagram, Facebook, and Pinterest. Visit my YouTube channel for free tutorials and tips. If you like my patterns, you can buy them on Etsy, and here on the website.
- Crazy for Candy Corn
Here’s an easy little table runner that’ll be perfect to set the candy bowl on this season ;) Or, just make one block for a table center! I made this one with the Creative Grids 60-Degree Diamond Mini Ruler, but you can make these same cuts with the original large ruler. You’ll need three strips each of the candy corn colors: white, orange and yellow. The white and yellow strips are cut 1¾” wide and the orange strips are cut 2” wide. Cut the ends off at a 60 degree angle, and be sure to remove those little tips with the flat end (this will help with piecing accuracy later). Arrange the strips in order, staggering the ends to make a 60 degree angle. Sew these together and press the seams open. These strips sets should measure 4½” across once sewn. Using the triangle lines on the ruler, line up the 4½” dashed line with the yellow edge of the strip and the flat tip with the white edge. Cut on both sides of the ruler, and slide the ruler down the strip to make the next cut. (Those opposite cuts with the white at the base and the yellow at the tips are not used. Set those aside). For the background, you will need four strips 4½” wide. Cut these into (46) 4½” triangles (I ran out of the charcoal gray and had to use solid black for some of these) and (4) 4½” diamonds. To cut the triangles, align the dashed 4½” triangle line along one edge of the strip and the flat tip along the other. Cut on both sides of the ruler, then rotate the ruler 180 degrees to make the next cut. To cut the diamonds, lay the whole ruler on the strip. Cut on both sides of the ruler, and move the ruler down the strip for the next cut. Arrange all the pieces into two blocks like this. One for each end of the runner. Notice how I have one candy corn block surrounded by three background diamond blocks. These will make larger triangle units (there are six units like these to make each block). Arrange the triangle units into sets of three to make what looks like a half hexagon. Do not sew the two halves together just yet. For the center block, the arrangement is slightly different. There are two triangle units like before, but the units on either side are pieced with the background diamonds creating a sort of chevron. Sew these units together and then into two halves. Arrange all the half blocks into two rows as shown. Sew the rows together with one horizontal seam down the middle to join them. For best results, press the seams open. I did straight-line quilting to finish it off. Bind and it’s ready for the candy bowl! Sew fun :) Happy Sunday everyone! Krista Follow all my quilty adventures on Instagram, Facebook, and Pinterest. Visit my YouTube channel for free tutorials and tips. If you like my patterns, you can buy them on Etsy, and here on the website.
- Measuring for Borders
One of the most pesky problems for quilters is trying to get borders to fit right on their quilts. Believe me, I see this with even the most experienced quilters so this isn’t me picking on the newbies :) Some borders are too long, and they “lettuce leaf” the edges by stretching them out as they are sewn on. Some borders are too short and they “tulip petal” the corners because they pull too tight. Nothing is more maddening than getting your beautiful quilt to the border stage and having the wheels fall off the cart in the final lap! Honeycomb Hexagon Quilt The most important thing is measure, measure, measure… in three different places. I measure on the right edge, down the middle, and again on the left edge. Take the average of all three measurements (in this case that is 50.5”), and cut the two side borders that same length. I know I will have to stretch the right edge a half-inch to match my average, and I will have to ease in the left edge a half-inch to match my average. Find the center on the border and the quilt top, and secure those points together with pins. Work your way out, in both directions, pinning the border in place stretching or easing little by little to make the ends match up. Sew them on and press them out really well, with the nose of your iron, making sure there are no hidden folds in the border seam. Now for the top and bottom border. Measure again, as before, only this time horizontally in three different places. Take the average of these new measurements, and repeat the slight easing and stretching process again. Press these borders out as before, and your quilt should lay beautifully flat and ready to quilt! Hint* How to find the average of your measurements. Take all three measurements, add them together, and then divide that number by three. I hope this helps! Happy Sunday, everyone! Krista Follow all my quilty adventures on Instagram, Facebook, and Pinterest. Visit my YouTube channel for free tutorials and tips. If you like my patterns, you can buy them on Etsy, and here on the website.
- That's Not Paint!!
I had a crazy idea this week while walking the aisles of the craft store. It started with fabric-covered pumpkins and morphed into this fabric “painted” pumpkin pillow! Years ago, we did a technique in quilting called “snippets” landscape quilts. This method uses fusible web-coated fabric cut into little snippets and then arranged to make beautiful landscape scenes. These quilts have a sort of painted look to them. It’s the perfect way to use up itty bitty useless scraps 🙂 I thought a pumpkin would be an easy thing to “paint” with my scrap fabrics. I gathered up a bunch of orange shades to do the job. First, mark your background fabric with the general shape of what you want to “paint”. I made a pumpkin outline and taped it to the window to trace it onto my background fabric. You can find a printable version of my pumpkin shape here. I tried a couple of different marking pens and finally settled on the blue air erasable. It's a faint line, but it all gets covered up anyway. Press all your scrap strips onto a piece of fusible web, then peel the paper side off. Cut these into chunks about 5” long and then cross cut into sliver strips that are ⅛” to ¼” wide. The narrower the sliver strips the easier they are to bend and manipulate, and that is going to come in handy! I set up my iPad with a picture of a watercolored pumpkin so I could use it for color and shade inspiration. You could do this with any picture you are trying to mimic. It really helped keep me on the right track. I began to “paint” with my sliver strips. I cut the ends of the strips at a sharp angle to give it that brushstroke look. I worked at the ironing board, so I could press things in place as I went, layering strips, lighter from the top and darker coming up from the bottom. The colors blended in the middle with plenty of overlap for a more organic look. Once the body of the pumpkin was set, I did the same fusible process to a few yellowy-green scraps for the stem. I cut these all about ⅛” wide, because the stem curves pretty sharply and they needed to bend quite a bit. Here you see the final product! My pumpkin and my inspiration pic :) not bad! I put it on my long arm and quilted the stuffing out of it. You can see the texture I added to the pumpkin and stem. Part of that is for looks and part of it is to hold all those little strips in place for the long haul! I cut the whole pillow top to 16” square, added a backing and a zipper, and here it is! Such a pretty, pretty fall pillow. I'm so happy with how this came out! This will grace my living room for the season. Happy Sunday everyone, Krista Follow all my quilty adventures on Instagram, Facebook, and Pinterest. Visit my YouTube channel for free tutorials and tips. If you like my patterns, you can buy them on Etsy, and here on the website.
- Know Your Needles
Ever wonder what sewing machine needle is best to use for each project? Here is a handy guide to help take the mystery out of “knowing your needles”. This isn’t an exhaustive chart, but it should give you a good start in understanding the world of sewing machine needles. I’ve given you a little description with basic fabric info for each needle… truthfully, I use a Universal needle most of the time (size 80/12 to be exact). I do have all of these needles, however, and when the occasion to hem a pair of jeans (shhhh, don’t tell anyone I do that), or sew a patch on my brother’s leather motorcycle jacket arises, I have just the needle for the job! I hope this helps and you enjoy it :) Click to download PDF Happy Sunday everyone, Krista Follow all my quilty adventures on Instagram, Facebook, and Pinterest. Visit my Youtube channel for free tutorials and tips. If you like my patterns, you can buy them on Etsy, and here on the website.
- Falling for Fall Foliage
Ahhhhh!! I am so excited to share my latest pattern with you! I have designed over forty patterns and none of them have had a Fall theme… until now! Just this week, it has really started to feel like Fall around here. Warm summer days capped on each end by misty morning dew and crisp evening air. I love it! It's the perfect quilting weather :) This pattern has been in the works for quite a while, and I am so happy with how it came out. I used a beautiful plum ombre for my background and the light movement it creates makes me think of late summer sunshine spilling through the trees. This week, we filmed a new YouTube video to show you the cuts and layout of the leaf blocks and the setting triangles. I walk through the process of getting color play out of the background fabric and the leaf shades. I also show a layout idea for a table runner version. Fall Foilage will be our Quilt Along this year! So far, we've done three Christmas Quilt Alongs and one Spring one. I think a Fall themed one is in order! In these quilt alongs, I film a new tutorial each week teaching the process step-by-step. These videos are pre-filmed and uploaded into the private Facebook group. We will start the Quilt Along on Tuesday, October 24th, and upload a new video each week for five weeks. The videos will be available in the group for several months after the quilt along has ended. There is no charge for the Quilt Along, but the purchase of the pattern is required. If you would like to buy the kit with the exact fabrics I used, you can find that here. Or, you can purchase the pattern, only, in both PDF and printed form. You'll receive an email with the quilt-along sign-up info after the purchase of either of these from our shop. Or, you can go to Facebook and type in Fall Foliage Quilt Along and request to join. We will verify your order, and admit you to the group. Happy Sunday everyone! Krista Follow all my quilty adventures on Instagram, Facebook, and Pinterest. Visit my YouTube channel for free tutorials and tips. If you like my patterns, you can buy them on Etsy, and here on the website.
- Labor Day SALEabration!
In the 19th century, labor activists pushed for a day to recognize workers. Now, we celebrate Labor Day on the first Monday of every September. This makes for a great cap to the end of summer and the perfect opportunity to do a big sale...but more on that after some quilt talk. Did you know there are quilts about Labor Day? Crystal King, (our resident historian :) (she hates that title) did a little digging and found some amazing quilts that showcase our daily labor. These are quilts from historical memorials to portraits of daily labor. I hope you enjoy another neat part of history that involves quilts. Portrait of a Textile Worker was designed by the visionary artist, Terese Agnew in 2005. She spent two years collecting clothing labels for this project. She stitched together thirty-thousand clothing labels, over two years, to "make one person among millions of unseen workers, visible." I'd say she succeeded. Tribute to the Mohawk Ironworkers was made by the Indian artist, Carla Hemlock. It depicts ironworkers sitting on an I-beam hanging over New York City. This quilt has been added to the American Women: Remarkable Objects and Stories of Strength, Ingenuity, and Vision from the National Collection at the Smithsonian. The quilt is made from cotton cloth, glass beads and beads, sequins, cotton thread, nylon thread, and metallic thread. It's a combination of sewing, pieced, appliquéd, overlay beadwork, raised beadwork, and quilting. Visionary artists and quilters depict historical labor in fabric. Sarah Joy Ford is one of the artists who uses textiles and archival research to preserve history. She made Islington Mill to commemorate the 18 workers killed in the collapse of the Islington Mill, in 1824, in Manchester, England. The names and ages of the lost workers are written on the blocks. Explaining the important elements in the quilt, she said, "The motifs in the quilt pattern include cotton spinning wheels, which many of the workers would know well, while the illustrations are of the mill itself, based on an original etching of 1824, the ever-present clouds over Salford, and an image of the Salford Cross, the beacon of old town life which was taken down the year of the accident." What a tribute to these workers! They will never be forgotten. ILGW was created, in the 1980s, by members of the International Ladies' Garment Workers' Union, Local 23-25, in New York City. This quilt features the union's cultural initiatives under the direction of Kathy Andrade. Labor Arts Inc. wrote: "The quilt itself represents an extraordinary example of women of diverse ethnic backgrounds using their after-work hours to not only sharpen up their sewing skills but also to demonstrate the union's potential as a source of cultural achievement." Threads of Life, designed by Laurie Swim, was made in 2003 in Canada. This quilt is a memorial to thousands of workers killed or injured on the job who are between the ages of 14-24. It commemorates 100 young workers killed on the job with individual, personalized blocks. The middle block honors young workers injured on the job. The Farrier by Paula Batterman-O'Dowd was published in Quilter's Newsletter Magazine Sept-Oct 2008. There's something so sweet about this farrier shoeing a horse, and the detail in the quilt is amazing! The Triangle Fire Memorial Quilt is part of the Workers Memorial series by artist, historian, and quilter, Robin Berson. One of the deadliest fires in US history, it caused the deaths of 146 garment workers: men, women, and children. Many of our workplace safety laws came out of this tragic event. Text on the quilts includes beloved labor songs and quotes on the rights of workers. Blossoms, A Tribute to Women in Fabric by Peggy Fetterhoff. This quilt is a celebration of women in all walks of life. I love the closeups of each block which show women in different periods. Aren't these fun? The artist wrote, "Traditions in America's melting pot are about change. As each ethnic group is integrated, women blossom with the knowledge that they can be anything they want to be. Cultures are merged, creating new traditions." I hope you enjoyed our tribute to labor in these amazing quilts. What stories they tell! In honor of Labor Day, we are having a great big sale. Anything you can fit into your cart is 20% off until Monday, September 4th, at 11:00 pm, PST. That's patterns, kits, yardage, rulers.... anything! You don't have to use a coupon code, your whole shopping cart will automatically be 20% off! Thank you for your encouraging comments each week and ongoing support of this little labor of love business :) Happy Labor Day everyone! Krista Follow all my quilty adventures on Instagram, Facebook, and Pinterest. Visit my YouTube channel for free tutorials and tips. If you like my patterns, you can buy them on Etsy, and here on the website.
- Ruler Storage
So many rulers and no place to put them!! Recently, I acquired quite a few new rulers and suddenly realized how little organization I had in that area. Piles everywhere are not conducive to a small sewing space, something had to be done. I've been asked recently about ruler storage (now that I have quite a few ;) How do I keep them organized?! I thought I'd share exactly how I handled that situation as well as a couple of ideas that others have used. There are a few different options out there for ruler organization and most involve tabletop storage of some kind. I don't have a lot of table space, so I decided to improvise! I bought this set of three little picture rail shelves and mounted two of them on a small unused wall. This is where I will store the rulers I don't use all the time. They are still easily accessible, and I can see exactly what I have so I don’t go buy the same one twice…. Done that… I mounted the third shelf above my cutting board. I mounted it upside down so I could use it more like a shelf. This is where I will keep the rulers I use the most. I bought one of these tabletop ruler organizers that would work beautifully, as is, but since table space is at a premium around here I decided to mount it to the shelf on the wall. The nice thing with these slotted organizers is they hold the rulers apart so it is easy to grab the one you need. I added a few hooks to the bottom so I could hang my rotary cutter and scissors within easy reach. I used double-sided mounting tape to make sure the organizer stayed put. Here it is conveniently located, right at the cutting table, with everything I need within arms reach! Here are a couple more options for small-space ruler storage (the pictures are kind of blurry, but you get the idea!). How about mounting temporary hooks to the back of a door? Brilliant! Or, maybe use something like a glorified shoe caddy that hangs over the door or off a shelf. You could easily make one, out of canvas and clear vinyl for transparent pockets, to fit whatever space you have available. Here is one more clever tabletop option, use an old file folder. It can be tucked away in a cabinet to keep everything organized. I hope this was helpful! And, gave you some good ideas on ways to stay organized :) Happy Sunday everyone, Krista Follow all my quilty adventures on Instagram, Facebook, and Pinterest. Visit my Youtube channel for free tutorials and tips. If you like my patterns, you can buy them on Etsy, and here on the website.
- Sunny Scraps
It’s funny how inspiration strikes sometimes. I’m always dreaming up new block ideas and just this week I thought I’d try an idea for a Sunflower. It turned out even better than in my head, and I just used scraps!! There’s a Sunflower Festival this time of year at one of the farms near my house. I’ve driven by the sign these last few weekends and that’s when this idea was born… sunflowers…hmmm (taps chin), I wonder how I could make that into a block. Well, I went to my scrap stash of mostly little chunks and orphaned 2½” strips. I dug around for the smaller scraps and cut them into 2½” triangles, you can cut a triangle out of as small a piece as 2½” x 3½”. You’ll need six triangles in yellows and six triangles in brown for one block. I also cut 2½” diamonds from my yellow scraps, you can get the diamond cuts out of as small a piece as 2½” x 4½”. You’ll need a total of (18) 2½” yellow diamonds. Here are a couple of charts, I did a while back, to help you maximize your scraps and determine how many cuts you can get from each size strip. PDF VERSION PDF VERSION This is the basic sunflower petal layout. One yellow triangle and three yellow diamonds with a brown triangle to cap it off at the bottom. Sew the pieces together into two little rows, then sew the center seam to join the two rows. Make six petals like this for one flower. Now for the blade petals. These take bigger scraps. I cut three 3½” x 4½” yellow rectangles and 3½” x 4½” blue rectangles. Repeat this setup with a second set of rectangles, but use a slightly different shade of yellow or a variety of scraps. Sew those rectangles together into a long row and press the seams open. Cut these into 4½” triangles as shown. Starting from the bottom of the strip, align the center line on the ruler right up the seam between the blue and yellow fabrics. Line up the dashed 4½” triangle line along the bottom edge and the flat tip of the ruler at the top edge. Cut on both sides of the ruler, then rotate the ruler to make the next cut. This will give you six triangles with blue on the left and yellow on the right. For the next shade of yellow/blue rectangles, start cutting from the top of the strip. Align the center line on the ruler, right down the seam between the blue and yellow fabrics. Line up the dashed 4½” triangle line along the top edge and the flat tip of the ruler at the bottom edge. Cut on both sides of the ruler, then rotate the ruler to make the next cut. This will give you six triangles with blue on the right and yellow on the left. Here you see my stacks, like a two-toned mirror image. Take the original petal units, and add one of these blade petal triangles to each side. Make six bigger triangle petal units like this. Keep the same blade petal colors on each side for all the units. Press the first seam in towards the original petal unit and the second seam out towards the triangle blade unit. This will help with nesting seams later. Arrange all six units into a hexagon sunflower as shown. Sew these units together into two halves, of three triangles each, pressing the first seam open before adding the third triangle unit. Sew the two halves together, and press that seam open. I made three sunflower blocks like this for the table runner. You will need four 8½” triangles to fill in around the sunflower blocks. You can use the triangle lines on the Large Creative Grids 60-degree diamond ruler (I used the Mini Diamond Ruler for the petal pieces, but you could use the large for those too). If you do not have the large ruler, you can use another triangle ruler as long as you can get 8½” triangles from it. Here you can see the layout with the large triangles in place. Sew the triangles to each sunflower as shown. Each end sunflower only takes one triangle, while the middle one takes two. Sew these units to each other with long diagonal seams and press those open. I quilted this runner with my go-to simple straight lines all the way across. I tried to take a close-up picture so you can see how the thread color fades into the surrounding fabric. I chose to use a very rich, warm gold-colored thread thinking it would disappear on the sunflowers, but I didn’t realize how well it would blend into that dark blue background. If I had gone with a lighter yellow thread, it would have stood out like a sore thumb on that blue… sometimes darker is better 🙂 I got a little carried away with my scrap cutting and had enough to make one more sunflower. I thought it would be cute to add a black and white background and make it up into a sunny throw pillow. This picture was taken later in the day with that warm afternoon sun, but I think it will be darling and I can't wait to finish it up! I’ll try and post a pic to Instagram this week when it’s all done. I hope you are inspired to tackle an unsuspecting pile of scraps this week! I can see these flowers in all kinds of colors! Happy Sunday Everyone, Krista Follow all my quilty adventures on Instagram, Facebook, and Pinterest. Visit my Youtube channel for free tutorials and tips. If you like my patterns, you can buy them on Etsy, and here on the website.
- Put a Label on it!
Sigh... Labeling the quilts I've made is not something I’m good at. Here's a picture of me at around fifteen with my second quilt. This might be the last quilt I labeled. I hope my quilts will all be used, to death, long before someone thinks to figure out who made them and why! Haha! Nothing would make me happier :) But, I like to read the labels on other people's quilts… I know, nosey right? It’s something about the history and the story they tell. I’ve worked up four main categories for labeling quilts and the kind of information you would include in each! This might help you tell a little about the story of your quilt in label form. And this time of year when we are entering a lot of our work in state and county fairs, it seems like a good idea to put a label on it! The Minimalist This label is pretty bare bones, just the basics. Who made the quilt, and Who it was made for. Done. The Professional While still basic, this label has a few more details. In addition to the to-and-from information, it may also include the name of the quilt and the year it was made, the size, and the material used (I.E. 100% cotton). It should also include both the piecer's name and the machine quilter's name (if it was professionally longarm quilted). The Historian This label reads just like it sounds! Full of historical information for future generations. You can include just about anything of significance on this label. In addition to all the information from the professional label, the historian may include the occasion the quilt was made for, who designed it, and whether it was an original design or someone else's pattern. Memorable facts: was it made from a loved one's old clothes or ties? Maybe it would even include a favorite quote or verse. The Eccentric This is where the wheels come off! Haha! This label should be the size of a full page and include everything above, possibly adding the story of the quilt's inspiration, the care and washing instructions, and a veiled threat to the recipient: if not treated with care, you will come back to haunt them in their dreams ;) You get the idea… go to town! Well there you have it, that was fun! I might get better at labeling my quilts now! If you would like to print this as a handy infographic click HERE Happy Sunday, everyone! Krista Follow all my quilty adventures on Instagram, Facebook, and Pinterest. Visit my Youtube channel for free tutorials and tips. If you like my patterns, you can buy them on Etsy, and here on the website.
- Easy as 1, 2, 3…no kidding :)
Do you need a little end-of-summer project for the kiddos before they are all wrapped up in the school year again? I think they would love to do something like this! And it's the fastest way to piece bits and pieces together with remarkable accuracy! I had a pile of little 2.5” squares just sitting here collecting dust. These are called “crumbs” in the precut quilting world. Instead of piecing each one to the next in the traditional (tedious) way, I figured I’d break out an old technique from the years of colorwash quilts! I cut a 20” square piece of basic fusible apparel interfacing. I laid it down with the bumpy side up (the bumps are the fusible glue dots). I laid out my squares eight across and eight high. Then, I played with the colors until I liked how they looked. Notice how the edges of each square line up very close to the next one without overlapping and without too much of a gap. I was pretty careful to make sure the rows of blocks looked straight. I slid the whole thing onto a piece of cardboard and took it to the ironing board. I gently pressed everything in place, slowly moving from one section to the next making sure each square is fused down. Here it is after fusing. I gave it a little shake to be sure nothing came flying off! Fold the first row over, right where the rows of blocks meet, and stitch with ¼” seam allowance. Continue folding and sewing each row until all the vertical rows are sewn. Be sure to pull the whole thing open again, between rows, so you don’t end up catching the last row in the next seam. Here is what the front looks like after the vertical rows are sewn. It really shrinks up quite a bit. Before sewing the horizontal rows, clip just up to the stitch line between each block. This will allow you to flip-flop the seams when sewing in the other direction. Now just as before, fold the first row over. With your fingers, press the top seam one way and the bottom seam the other. Stitch each row with a ¼” seam, being sure to flip-flop each seam as you get to it (they like to stand up on their own). All the seams are sewn, it just needs a good pressing. The best part is I don’t have to worry about my seams fraying because they are all wrapped in fusible web, perfect for the inside of a pillow. Here’s the finished top! Would you believe that only took ten minutes from the time I started sewing?! It’s gotta be the fastest way to piece something ever, and all the intersections match perfectly! This could be done with rectangles too… wouldn’t that be cute? Another stash-busting idea or a good way to use up scraps :) I trimmed it up, then added a backing and zipper... and voila! Happy Sunday, everyone. Krista Follow all my quilty adventures on Instagram, Facebook, and Pinterest. Visit my Youtube channel for free tutorials and tips. If you like my patterns, you can buy them on Etsy, and here on the website.
- How To Piece Batting
Waste not, want not, right?! I have a thing for piecing scraps of batting together to use in small projects. It’s not the only time I piece batting, but there’s something satisfying about using what I have and making do. Here I am preparing to piece four different bits together, (don’t laugh), to use in a table runner :) There are many other reasons you may need to piece batting. If your quilt is odd-sized and the packaged batting needs to be made longer or wider, you may need to add a strip to the side or bottom. Each batting type (100% cotton, cotton blends, wool and polyester) will need to be treated differently in the piecing process, so I thought I would cover the basics for each one! First, we’ll do 100% cotton. This batting is flat and dense making it the easiest to piece if needed. You'll want to start by trimming the edges you plan to join, they need to be perfectly straight. Now, butt the two edges up together and do not overlap them; that would cause a lump in the batting, and it's very noticeable once it has been quilted. You can use a fusible batting tape (available at many fabric stores), or I just cut myself ¾” strips of fusible interfacing to make my own tape. Lay this over the joint and press into place. You’ll want to pay close attention that the two sides don’t drift away from each other while pressing the tape in place. Go ahead and stitch the joint at this point. You can use just the tape and it will hold for smaller projects. But if you have a bigger quilt and it’s going to get handled a lot during quilting, you may want to stitch the joint to be safe. Stitch using a triple zigzag stitch. This stitch takes three small stitches to the left and then three small stitches back to the right to get the zigzag look, but adds more stability. This stitch also helps keep the joint very flat. Cotton-blend batting can be pieced in a very similar way. It's made with some polyester in it so it shouldn’t be ironed; this makes it hard to use the fusible tape to join two pieces. You can still stitch the joint together with the triple zigzag, but take your time because blend battings have more stretch in them and the seam/joint can become distorted easily (notice the slight bubbling around the stitch line here). Now, let’s look at wool batting. Here, I have some nice fluffy wool batting; it's considered a higher loft batting. This kind of batting shouldn't be pieced together by machine, because the stitches will “crush” the loft of the batting. I hand-pieced this batting with big whip stitches that are almost on the loose side. You don’t want to pull your stitches too tight, or it will bind up the batting making a ridge or bump that is very obvious after quilting. Last, but not least, is high-loft polyester batting. This has to be hand-pieced, like wool, although it is a little denser than wool (low loft polyester can be machine-pieced like cotton-blend batting). I use big whip stitches again, but this time I go up, angling the stitches one way and back down the other way making little X’s. This helps secure the edges to keep them from separating or splitting, making a ridge or valley, if they were to be pulled apart. And again, don’t pull your stitches too tight or it will crush the loft and become noticeable after quilting. I love to use up every last scrap. Here's a series of scrap and orphan block quilts I did a while back. I pieced the batting for each one of these from leftover bits! I hope that was helpful :) Happy Sunday everyone, Krista Follow all my quilty adventures on Instagram, Facebook, and Pinterest. Visit my Youtube channel for free tutorials and tips. If you like my patterns, you can buy them on Etsy, and here on the website.
- What do you know?!
Have you ever considered the weave of your fabric? In the world of loom weaving, this is called the warp and the weft. In the quilting world, we call this the straight-grain and the cross-grain. I thought I'd share a few things about how fabric behaves, depending on how you cut it and the best uses when cutting your fabric in each direction. You might be surprised at what a difference it makes! First, we have the cross grain or the “weft” direction. These are the threads that run from selvage to selvage. This is the most common direction to cut strips for quilting. We typically cut our binding strips this way before sewing them end to end. This makes for great binding because the cross grain has a little bit of stretch to it. That little bit of stretch will help the binding go on smoothly and wrap snuggly around the quilt. Now, we have the straight of grain or the “warp”. These are the threads that run the length of the fabric parallel to the selvage edge. When the fabric is being made on the loom, these threads are pulled very tight which makes for flat fabric, but it also means there is no stretch whatsoever when cutting strips in this direction. You have to be careful when using strips cut straight of grain, the lack of stretch will often pucker the fabrics around it because they have more stretch and the difference between the two will cause issues. The key to using straight of grain cuts for borders or sashing is to measure and pin, measure and pin. One use that is ideal for straight-of-grain binding is when facing a quilt instead of binding it. The non-budging nature of the straight of grain strips will hold those edges perfectly flat giving a wrapped canvas look. Last, but not least, we have the bias-cut strips. These are cut diagonally across the fabric. Typically, that's done at a 45-degree angle, although it isn't necessary. These strips will stretch like crazy, because all the threads making up their weave are shorter, without having the warp or weft running the length of the strip for stability. Bias cutting a striped fabric does make a cute binding on a straight-edge quilt though! Bias-cut strips are ideal for binding a scalloped edge where the binding has to curve in and out of the scallop. You’ll need its stretchy nature to manipulate those curves. I used bias-cut strips to piece “vine” like curves into the background of this art quilt before adding the flowers on top. They will bend in gentle arches if cut narrow enough, and they press out beautifully once pieced in. How interesting is that, huh? I found this video on YouTube that shows the most amazing parts of the fabric weaving process, and I thought you would enjoy it too! Happy Sunday everyone, Krista Follow all my quilty adventures on Instagram, Facebook, and Pinterest. Visit my Youtube channel for free tutorials and tips. If you like my patterns, you can buy them on Etsy, and here on the website.
- I'm Taking You on the Road!
This week, I thought I would give you a fun sneak peek at what I do all the time! I’m taking you to class with me! I was teaching in Montana this week, and we had the funnest group of students making quite a range of quilts. The first couple of days were spent making Fanfaire and Entangled Sky. Just look at these color combos, aren’t they amazing?! Working block by block with the layout, they all started taking form. It is quite a process to witness. The proud sewists showing off their handiwork 🙂 I even had some time to work on unfinished samples in the evenings, and I made quick work of these two lap-size Summer Swag and Vintage Windmill made from demo blocks. It felt good to get a bunch of these sample/orphan blocks put together and off my to-do list. Days three and four were spent making my new Flutterby Frolic pattern. These flowers and butterflies are all coming together beautifully. The little plaid fabrics shown here are from old shirts. She is using this pattern to make an amazing memory quilt! We took a little break for Show and Tell, and Sue showed us her recent finishes of Rock n Roller Coaster and her Summer Swag! Rock n Roller Coaster is a baby quilt pattern, but she made it about four times the size and it looks amazing! Amber snuck in some time to work on her Semaphore Stripes, and we all stood back in awe when she finished laying the pieces out! Stunning!! Last but not least, in my evening sewing, I was able to finish my own Vintage Windmill quilt in this pretty floral, red, white, and blue collection. Now, to find time to quilt it…. Haha! I hope you enjoyed tagging along this week 🙂 Happy Sunday everyone, Krista Follow all my quilty adventures on Instagram, Facebook, and Pinterest. Visit my Youtube channel for free tutorials and tips. If you like my patterns, you can buy them on Etsy, and here on the website.
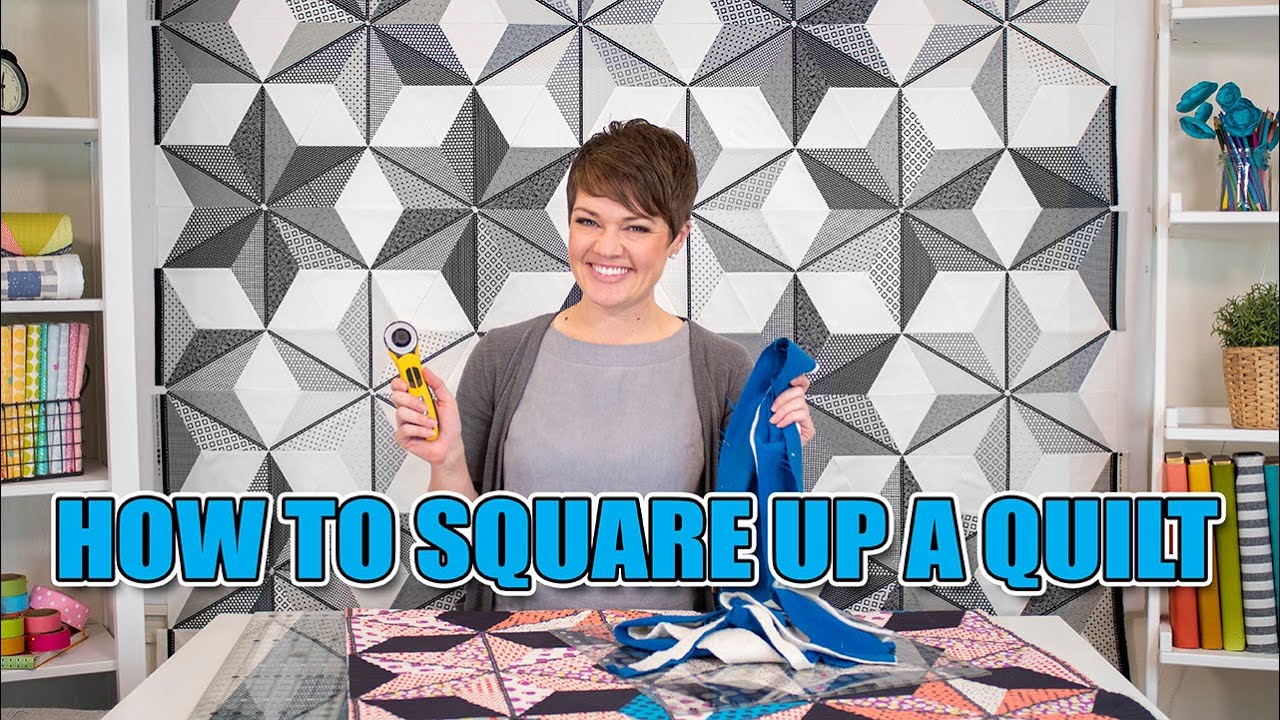
- How to Square up a Quilt
Have you ever struggled to get your quilt edges squared up before adding binding? Well, I think I can help :). I made a video to show my method for quickly and painlessly getting my quilts trimmed and ready to finish. This method is great for most quilts. If your quilt is way, way off square, and needs to be pulled back in line, you may need to do a blocking process to get it closer to square before using this method. I will try to do a blog on that more involved blocking process in the future! I hope this helps! And if you want to get your hands on the pattern for the quilt behind me, you can find that pattern here. Happy Sunday everyone, Krista Follow all my quilty adventures on Instagram, Facebook, and Pinterest. Visit my Youtube channel for free tutorials and tips. If you like my patterns, you can buy them on Etsy, and here on the website.
- What Do you Know About That Flag?!
Have you ever wondered about the history of our national flags? How they were made, who designed them, and why they chose the fabrics they did? I was just thinking about this, this week, after doing my own hand-piecing project. What it must have been like to do everything by hand, including those early flags. After all, they are kind of like quilts :) Here in America our stars and stripes have gone through several iterations on their way to becoming what we display today. Crystal is our resident historian around here, she loves to dig up interesting tidbits about history, and I asked her to look into the origins of our American Flag. I think you’ll enjoy what she found! This quote, attributed to George Washington perfectly states the purpose and meaning of our flag as a symbol of our independence: "We take the stars from heaven, the red from our mother country, separating it by white stripes, thus showing that we have separated from her, and the white stripes shall go down to posterity, representing our liberty." Betsy Ross flag, 1777 Betsy Ross fulfilled that vision by sewing the first stars and stripes. George Washington and Col. George Ross entered Betsy's shop and asked her to make a flag that would unite the country. They showed her a sketch of a square flag with six-pointed stars. She suggested a rectangle and five-pointed stars. Asked if she could make a five-pointed star, she replied, "Nothing easier was her prompt reply and folding a piece of paper in the proper manner, with one clip of her ready scissors she quickly displayed to their astonished vision the five-pointed star; which accordingly took its place in the national standard." link On June 14, 1777, the Continental Congress passed an act establishing an official flag for the new nation. The resolution stated: “Resolved, that the flag of the United States be thirteen stripes, alternate red and white; that the union be thirteen stars, white in a blue field, representing a new constellation.” link "It’s the stuff of elementary school pageants and patriotic legend: In the capital of a new nation at war with its colonial rulers, a widowed seamstress made history when she fashioned the first American flag. Her name was Betsy Ross. Although a beloved national myth holds that the Philadelphia upholsterer helped design and stitch the emblem of the United States, Ross’s involvement in the history of the American flag is widely regarded as apocryphal." link Did you know Betsy Ross had been unseated from her place in American flag history, I didn't! I hate to see Betsy so maligned, but apparently, it's common knowledge. Betsy was never credited with being the maker of the flag, but she continued to tell her children and grandchildren the story until she died in 1836. She was first credited with making the American flag, in 1870, when her grandson, William Canby, made a speech to Pennsylvania's Historical Society. There is no documentary evidence to verify her story, but Betsy Ross and her daughters were both flag makers. She made flags for the Pennsylvanian Navy during the American Revolution and continued to make them after the Revolution for the next 50 years. Historians no longer believe she designed the first flag, but they can't prove she didn't either. Nor, do they know who was the designer. There are a few theories, though. Continental Congressman Francis Hopkinson, a signer of the Declaration of Independence, may have been inspired by John Hulbert's six-pointed star flag that he made for his militia. In July of 1775, a 13-star, 13-stripe flag was flown at Fort Ticonderoga. Hopkinson may have been influenced by Hulbert's design. Others believe Hulbert was the original designer, because a tattered and extremely old flag with six-pointed stars, as many as 200 hundred years old, was found at the house where Hulbert once lived. It's more likely that Francis Hopkinson is the original designer, and that he used Hulbert's original design, but changed the six-pointed stars to five-pointed stars. He used the same colors in the Great Seal and he worked on the first American coins. "There’s a letter he wrote Congress, three years after he designed these things. In 1780, he said that it had been three years and he had not been paid. He would settle the matter for a “Quarter Cask of the public wine.” link I bet you would too! Francis Hopkinson was a patriot, lawyer, poet, artist, and signer of the Declaration of Independence. He also sold port wine and a variety of fabrics. There's a long history of wine, women, and.....sewing! Fabrics A wool bunting fabric, produced in England, was the material choice for early American flags. It was favored over cotton, which faded more quickly and didn't unfurl as well in the wind. Linen was also used to make stars, or to make flags, because of its strength. Silk was used for military flags and special occasions but it was expensive. In 1865, toward the end of the Civil War, President Lincoln signed a law requiring the federal government to purchase flag bunting only from American manufacturers. Hemp was the most commonly used fabric for outdoor flags because it's tough and can withstand changes in temperature and the ravages of wind and rain. Wool was used because of its durability and ability to shed water. Flags were often made from cotton or silk and made by hand until sewing machines were mass-marketed in 1855. Early Americans used natural dyes to make the red stripes and the blue backgrounds. Undyed or bleached material was used for the white part of the flag. The red dye was made from the root of the madder plant or from a female cochineal, an insect that lives on specific cactus plants. Blue dye was made from the woad and indigo plants which contain blue dye in the leaves. So, all you had to do was spot a patch of indigo or madder, hang it to dry, crush it up, and hey presto, you have Rit Dye! Indigo and Madder Plants The most common method for assembling the American flag has been sewing pieces of dyed and undyed fabric together, and then sewing or embroidering the stars onto the blue material. Here are some terrific textile projects of the American flag from across the Smithsonian. Mary personalized her quilt with the name of her son, George Teter, and the names of the Generals under whom he served. She also quilted the names Abe and Abe Lincoln. She appliquéd thirty-four stars in the center diamond and the same in the border. They represent the number of states in the Union during the Civil War years. Since our founding in 1776, there have been 27 different versions of the flag. Each new flag represented the addition of one or more states. Events, like wars and politics, continued to bring about changes in the flag. To see how the flag changed over time, click this link. And, as we celebrate our freedom, we must remember the sacrifice of those who died on 9/11. Our flag forever stands as a symbol of sacrifice, freedom, unity, and courage. Long may it wave o’er the land of the free and the home of the brave. I hope you found something interesting here. I learned a few things too. Happy Sunday everyone and Happy Independence Day, too! Crystal King Our number one request is a Honeycomb Hexagon Kit. You asked, and we listened! We just added Honeycomb Hexagon Fabric Kit to the shop! Follow all my quilty adventures on Instagram, Facebook, and Pinterest. Visit my Youtube channel for free tutorials and tips. If you like my patterns, you can buy them on Etsy, and here on the website.
- Don't Throw That Out!
This week, I revisited an old project from a couple of years ago. I'd made this cute crumb triangle pillow cover with the leftover off-cuts from my Heart Candy Quilt, and guess what else has those same size off-cuts? My New Flutterby Frolic pattern! This time, I used (288) 2” triangles to make an 18” square pillow. And, I hand-pieced the entire thing! I've never done hand piecing before, and I have to say it was kind of fun :) It all started as my brainy idea to keep my hands busy on a road trip last week. We went to Banff, Canada, and I knew there were going to be some long driving times throughout the week. I didn’t have much time to prepare what I needed, so I grabbed my stack of triangle off-cuts and a couple of extra strips in case I needed more triangles. I also packed a soft blue/green as my background and the world's smallest rotary mat, and we hit the road! The first hotel night provided the opportunity to lay out all my pieces and figure out the size. This ended up as 12 rows of 24 triangles in each row. I packed a piece of batting so I could roll it all up and stay organized as I built rows. Row by row the triangles came together and with a little help from the hotel iron they looked pretty good. As I said, I've never hand-pieced anything from start to finish before, so this was quite an adventure. I pieced triangles in the car, and while we waited for our lunch order. I even found a willing and inquisitive student in Frosty the Snowman ;) I’ve got some things to learn about hand piecing, including, how to keep the thread from tangling. I spent part of a gondola ride, down one mountain, trying to pick out a very tiny mess in my thread. I know there is a thread treatment product for just this sort of thing, but I had nothing on hand. On one of our last days, we stopped at the cutest little fabric store in Nelson, BC called Stitch Lab. I thought it would be fun to find my pillow backing there to complete the whole project; a nice memento to this well-traveled project. The final night on the road and all the rows are complete and joined to each other. I took advantage of another hotel iron to give everything a quick press before the last leg of the journey and hopefully the last of the rows coming together. Once home, I gave this well-loved traveling companion a proper pressing with a little starch, and just look at how nice it came out! Now, I'll make it into the pillow cover it was intended to be. Below, you can see my original pillow from a couple of years ago with full instructions on how to make your own. I did that one by machine, and that was much faster. But I have to say, this one has been more rewarding. You guys know I’m a sucker for pretty scraps, and the Heart Candy quilt produced the prettiest pile of clippings. If you watched the YouTube video, you’ll remember I said to keep those scraps! Well, I sewed them all together and made this sweet crumb quilt pillow :) You can make this by using your scraps from the heart block cuts, or by cutting a bunch of scrappy 2” triangles from whatever you have laying around. I made a 16” square pillow and that took (220) 2” triangles...you read that right! 110 pink triangles and 110 white triangles. You can see the bottom row here and how much it shrunk up once the pieces were sewn together, crazy! For my background, I cut triangles from 2” white strips and laid them out alternating the pink triangles. Notice how I placed the pink triangles with their flat tips down and the white with their flat tips up. This will help keep the bias edges facing each other and cut down on the complications of bias stretch frustration. I sewed each row together in sets of two (a pink and a white triangle) Press the seams between each triangle set open. Sew them into sets of four and then into full rows. Each row has (10) white triangles and (10) pink triangles. Press all seams open. Progress was slower than I thought, but it was coming out so cute I had to see it done! Once all the rows were sewn and pressed, I sewed the rows to each other, two rows at a time, pressing the long seams open. Then, into sets of four and so on. Once the whole pillow top was pieced, I gave it a good press with spray starch to keep all the seams flat. I quilted the top onto a piece of batting with straight-line quilting. I also quilted the pillow back in the same way. Take a large square ruler, or use the lines on your mat, to trim the whole thing down to 16¼” (repeat with the backing panel). I usually put a zipper opening in my pillows, and here are my simple tricks for doing that! I cut the zipper about 1” shorter than the pillow, so in this case, that is 15¼”. I center the amount to make it about ½” shorter than the pillow on each end. I make a little double-fold tape-like wrap for the ends of the zipper. This will wrap around each end and be stitched down to act as a zipper stop at either end. I center the zipper and pin it in place, then stitch it along the edge to both the front and back panel. Once the zipper is in place, I sew the front to the back on the other three sides with a heavy ¼” seam and turn the pillow right side out. Notice how the corners with the zipper have the bound-off ends. Stuff with a 16” pillow form and you're done! Happy Sunday everyone, Krista Follow all my quilty adventures on Instagram, Facebook, and Pinterest. Visit my Youtube channel for free tutorials and tips. If you like my patterns, you can buy them on Etsy, and here on the website.
- Missing The Point
Does this situation look familiar? "Oh points wherefore art thou?!" I know cutting off the points in your quilt blocks is one of the most frustrating experiences even for seasoned quilters. I thought I would reverse-engineer this problem so you could see how to avoid it. All blocks with points involve at least three seams. I labeled the seams in order of assembly here. When the points get cut off, it is easy to assume that seam 3 is the culprit… but that is seldom the case! It all starts with seam 1. Here I am sewing my triangle to my diamond, and as I get closer to the point my ¼” seam allowance starts to drift narrow. It’s not too far off, so I leave it alone and press the seam out flat anyway. Then seam 2 happens, and this time I am a little more careful, but this seam drifts narrowly towards the pointed end too. Here you see the backside after I have pressed seam two out. Notice how close to the edge my crisscrossing seams are? From the front side, it looks a little better, but that point is actually only ⅛” below the raw edge at this point. Now for seam 3. You can see the slight bowing along the top edge of the pieced triangle due to those drifting seams, but I forge ahead thinking I’ll work it in ;). Well, that didn’t work out as planned. As soon as I sewed ¼” seam allowance to join the two triangles together, that point was gone! I was also trying to work in the bowing of the block a bit so the diamond wouldn’t have a bubble in the middle of it. The moral of the story is, seam 3 wasn’t the problem, seam 3 only revealed the problems from seams 1 & 2. So, let’s do that all again! Here I am sewing the triangle to my diamond for seam 1. This time, I used my stiletto to hold those points together as they got closer to the needle. It can be hard to hold these smaller points in place, and they often shift right at the end of the seam. A stiletto or wooden skewer, or similar tool, will really help keep things in check. Now you can see the seam is the same ¼” all the way across. Now for seam 2. I used the same technique with my stiletto to hold the triangle in place as I sewed it to the diamond/triangle unit. From the back, you can see a nice X where the two seams cross each other ¼” from the raw edge. Ready for seam 3! Things are looking good, there is no bowing along the top edge of the pieced triangle. I lay the pieced triangle on top of the solid one and start sewing my ¼” seam allowance to join the two. Here, you see my stiletto pointing to that X where my ¼” seam allowance will cross right at that point. Press it out and would you look at that?! No missing point! Here you see my whole block finished. When this block joins to the next ones on either side, there will be opportunities for missing points, but I was careful with this process to make sure I have ¼” of background on those outside points with seams 1 & 2. I really hope this helps! Happy Sunday everyone, Krista Follow all my quilty adventures on Instagram, Facebook, and Pinterest. Visit my Youtube channel for free tutorials and tips. If you like my patterns, you can buy them on Etsy, and here on the website.
- Hitting the Mark!
I thought I'd review a few different marking tools this week! I've never been one to mark on my quilts for quilting, but I've used a few different marking pens during the piecing process, so I gathered a few to test! If you want a perfect diagonal line to follow or are working on a project with special seams like Y seams, you might find marking your piecing is helpful. There are a few basic categories of marking pens: water erasable, air erasable, iron away, chalk markers, and scoring or creasing style markers. Frixion pens I've heard so many good things about the Pilot brand Frixion pens. They are made for paper and are erasable pens when used on paper, but the markings iron away when used on fabric! They have a super fine point, and the ink comes out evenly and without that scribbling/scratching motion :) I've heard the markings come back in cold temperatures until the fabric or quilt has been washed. I put my marked sample in the freezer to see if that was true, and the markings came back, but only about half as dark. If you are nervous about this, you might want to keep these markings to areas that will not ultimately show, like cut lines or the backside of the fabric. Crayola Washable markers How about that?! Not just for kids' coloring. I read a few comments from folks saying this is what they used for marking, and I had to give it a try! The line is thicker because it is a felt tip pen, but the color is clear, and you have plenty of colors to choose from if you are trying to find something that will show on your fabric. I used a Q-tip dipped in water to try and soak the line out. It just bled out but didn’t really disappear. It wasn’t until I soaked the whole piece and ran it under water that the markings completely went away. I was pleasantly surprised that they disappeared completely! This could be a great marking tool in a pinch, or at least for areas that won’t show in case some of those markings linger. Water-erasable and Air-erasable pens How about a two-in-one pen? Air-erasable on one end and water-erasable on the other. This dual-purpose Dritz marking pen is convenient to have on hand when you aren’t sure what the project requires. The blue marks come out easily enough with a wet Q-tip or washcloth. You may have to re-wet certain areas where you pressed the pen down harder, or the lines come back a little after it dries. The purple side is air erasable, and those lines will disappear after about 48-72 hours… or almost right away with a little water. So far, the lines haven't reappeared, and all is well :) I think this is my favorite pen of all. This water-erasable Chacopen, by Clover, has an eraser at the other end, and I couldn't believe how immediately it worked! The felt tip has a fine point and was easy to use for marking the ¼” dots on my hexagon blocks. Once I had sewn my seam, I went back with the eraser end to remove the dots… they vanished! Like wow! No waiting for the water to soak in or dry off, just poof gone. I will be using this pen a lot! This air-erasable fabric pen, by Sewline, has a nice steady roll to it. The line is very fine and the color is rich, so it would show on darker fabrics. It takes between two to ten days for the lines to go away on their own, but you can encourage them with water and they pretty much disappear before the water dries. It's always a good idea to wash a quilt, without detergent, to remove any faint lingering lines if they're in places that show. The heat from an iron may also set some of this ink, so maybe keep these markings to places that won’t be visible in the finished project. Chalk Marker If you're having trouble making very dark fabric, this is the best solution I have come up with. I know chalk markings aren’t ideal for all situations, but these lines show on black or almost black fabric and there aren’t many options for that! This Chaco liner pen, by Clover, has a little spikey wheel that dispenses a thin line of chalk, just like a pen would. It's ideal for running along the edge of a ruler, but nimble enough to mark curves. I gave my chalk lines a little blow to remove any excess chalk before working with the piece because chalk can smudge and get messy. Chalk markings work well for heavier fabric like canvas where other marking pens get lost in the weave. Hera maker This is another of my favorites! I, really, really don’t like pen markings on the tops of quilts. I'm so nervous that something isn’t going to disappear or wash out. Lollipops & Licorice With the Hera marker, by Clover, you can score the fabric along the edge of a ruler and then follow the quilting line. The lines dimple in quite a bit if you score them while the quilt top is layered up with batting already. And, you get the peace of mind that nothing has to be washed out or ironed away. I hope you found something helpful here! Do you have a favorite marking pen that I didn’t mention? I would love to know what you do when marking your quilts and pieces. Happy Sunday everyone, Krista Follow all my quilty adventures on Instagram, Facebook, and Pinterest. Visit my Youtube channel for free tutorials and tips. If you like my patterns, you can buy them on Etsy, and here on the website.
- Flutterby Frolic!!
It’s here! I can finally reveal what I've been working on for the past several months. This is my latest pattern, Flutterby Frolic, and I think it might be the prettiest one yet! The design process always goes through a couple of rounds of, oh wow, I hadn’t thought of that! It makes me feel like a spectator most of the time! When I laid everything out, and that ombre floral wreath took form, and then those butterflies turned out so dang cute, I wanted to add like twelve of them 😆 What a fun process! I filmed a new YouTube video to show you how the flower block goes together. This block uses a simple piecing trick to get your petals to swirl around the hexagon center. Four components make up the quilt: the flowers, the butterflies, the leaves, and the background blocks. The pattern has three size layouts: twin, wall, and a table runner. It's easy enough for a confident beginner, yet it has a complex look. I fell in love with this sweet line of small floral prints. I curated the ones I wanted to use for my flowers from the larger collection. I thought some of you would like these fabrics too, so I made kits using the same fabrics. This kit is for the twin size only, but you could get two wall-size quilts out of that one kit! The kits can be found here, and they include the pattern. If you’d like the pattern only, it is available as a printed pattern and a PDF here. I love sharing this creative world with you, and I hope you enjoy it too! Happy Sunday everyone, Krista Follow all my quilty adventures on Instagram, Facebook, and Pinterest. Visit my Youtube channel for free tutorials and tips. If you like my patterns, you can buy them on Etsy, and here on the website.