

Thinking Spring!
- Krista Moser

- Jan 10, 2021
- 3 min read
It doesn’t take me long after the holidays to start looking forward to spring :) I can hardly wait to see the sun set just a little later each day here in the PNW. I made this pillow a couple of years ago and while it’s a little early to be planning for St. Patrick's Day, I’m thinking I may do a pink version like a cherry blossom to brighten things up!

If you have my Creative Grids 60 Degree Diamond Ruler, then you could follow along and make your own in no time.

I bought six shades of green, light to dark, and cut a 1½” strip from each one. Sew the four lighter shades together and then the two darker shades together. Press these seams open.

Using the triangle lines on the ruler, cut (5) 4½” triangles from the lighter strip set. Align the 4½” line along the darker edge of the strip and the flat tip at the lighter edge.

From the darker strip set (of only two strips), cut (5) 4½” trapezoids. Align the 4½” line along the lighter edge of the strip set and the 2” star “burr” line along the darkest edge.


Cut a 2½” strip of background white, then cut (10) 2½” triangles from it. From that same strip, cut (2) 6½” trapezoids by aligning one edge of the strip along the 6½” line and the other edge along the 4” star “burr” line.

Cut (2) rectangles 5½” x 8½” from the background white fabric. Cut these in half diagonally by aligning the 8½” triangle line along the bottom and the left dashed center line along the left edge. Also, cut (1) 6½” triangle from the white background fabric (I forgot to take a pic of this step, sorry).

Now to assemble! Take the triangle of the four lighter shades and the trapezoid of the two darker shades, along with two 2½” white triangles, and lay them out as shown.

Sew the green units together, press this seam open. Then, sew the two white background triangles to each side, press these seams out. Make five petal/triangle units like this.

Arrange the petal units, as shown, and put the 6½” white triangle in the open spot.

I used a piece of green ribbon to make my “stem”. I manipulated it into a curve and glue basted it in place (see a tutorial on glue basting here). I then stitched on either side and trimmed the ribbon even with the edges of the block.


Sew the blocks together into two halves: the three bottom blocks and the three top blocks. Press these seams open.

Sew the two halves together, and press the center seam open.


Lay out the shamrock block with the background pieces, the two 6½” trapezoids, and the four corner triangles. Sew the trapezoids on first, and press those seams out.


Then, sew two of the corner units on, on opposite sides, press those seams out before adding the other two corner units. This will make a 14” x 16” pillow cover as is, I added a strip to the top and bottom to get myself a 16” square.
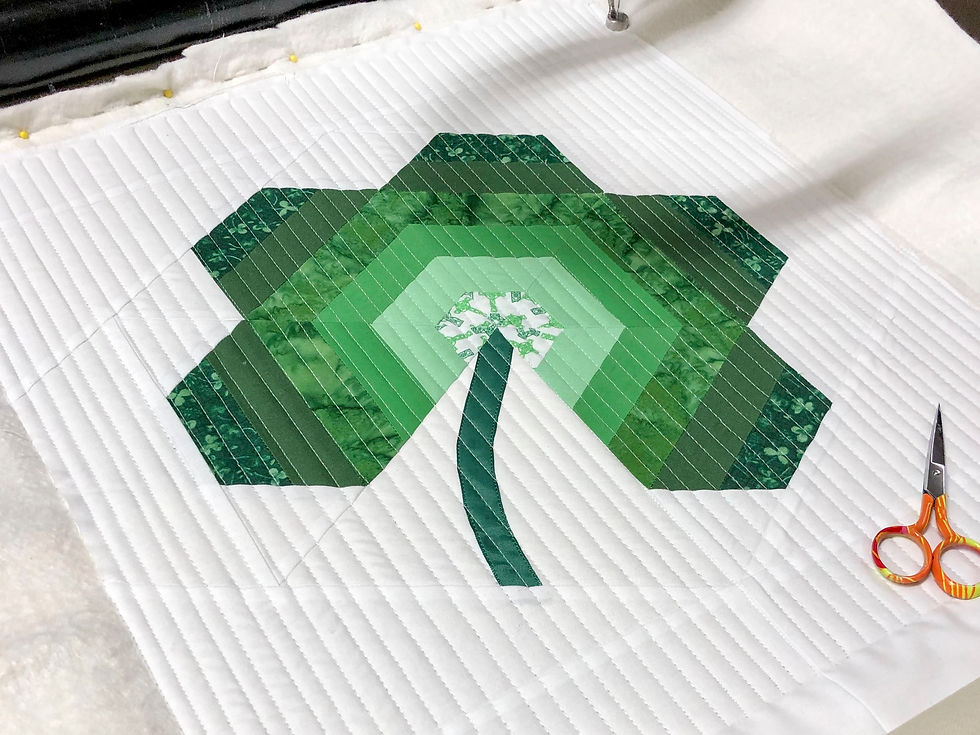
Here it is on the longarm after quilting. I made sure my top and bottom strips were oversized so I could trim it all down after quilting.

The top panel all trimmed and ready for a backing and zipper.

And there it is! A five leaf clover :)
Kinda fun, and pretty quick too!
Happy Sunday everyone!
Krista
Follow all my quilty adventures on Instagram, Facebook, and Pinterest. Visit my Youtube channel for free tutorials and tips. If you like my patterns, you can buy them on Etsy, and here on the website.


