


That's Cheating!

There is more than one way to get the look you want… and the alternative might be a lot easier!

I keep seeing plaid everywhere in the quilting world, and I love the look, especially for fall! This week, I thought I'd try an idea that ended up making a very cute throw pillow… next stop, a table runner and place mats 🙂

I used three different colors. One light blue, one medium purple, and one dark purple. Plus some bias tape. Cut your colors into 2½” strips. I used two strips each of the light and dark, and four strips of the medium.

Make strip sets using your 2½” strips. I cut my strips in half to be about 22” long and trimmed the right end off at an angle with the Large 60-degree Diamond Ruler.
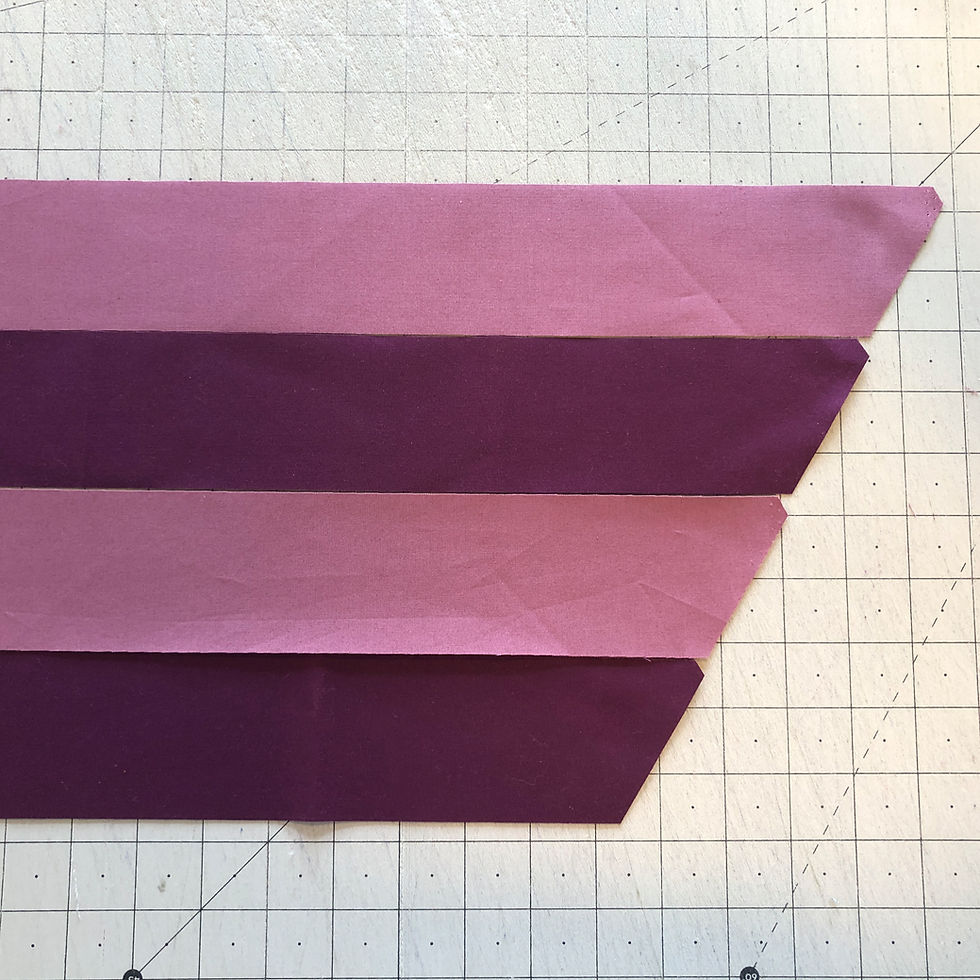
Alternate the dark and medium strips, staggering the angle-cut end. Sew these together with a ¼” seam allowance. This strip set should measure 8½” across once sewn. Press these seams open; it will make it easier to match up your intersections later.

Make a second strip set with the light/medium strips.

Cut these strip sets into 2½” pieced sections. Using the large diamond ruler, align the 2½” diamond line along the angled end of the strip set and cut along the right side of the ruler. Slide the ruler down the strip to make the next cut. Repeat this process with the light/medium strip set.

You should have seven pieced strip sections from each strip set.

Lay out those strip sections, alternating the medium/dark sets with the medium/light sets. I created a general layout to see how much coverage I yielded with the seven cuts from each set.
I separated the last two diamonds off the end of one light/medium set and moved them over to fill in the bottom left corner. Then, I cut a few more individual diamonds from each color to fill in as needed to get my full layout.

Now to sew them all together! I joined the original pieced sections together until they created long diagonal rows. Then began sewing the rows to each other.
There is a handy little trick to getting your diamond intersections to line up to each other. I use the edge of the large diamond ruler because it has a dashed ¼” line all the way around it. With a wash-away fabric marker, I marked ¼” from the edge at the seam on each of the pieced sections. Just a dot will do the trick.
Poke a straight pin through the dot on the one pieced section and into the seam on the one it will be joined to. The raw edges should line up at the outer edges, and the seams should make an X right where the pin goes through both seams. Pin each intersection like this and sew the rows together, getting just about on top of the pin before pulling it out.

Here you see the results! Pretty much perfect every time.

Once I had all the rows together, I pressed the long seams open and trimmed the top and bottom off flat. I quilted the whole piece with ¼” straight lines all the way across.
Now for the fun part! I used a long straight ruler and my Hera Marker to put crease lines in the middle of each row of diamonds. I marked the lines criss-crossing both directions.
I had about eight yards of single-fold bias tape that I folded over a second time, making it a shy ¼” wide. This was perfect for the argyle plaid lines across my diamonds.
Because the diamonds were already quilted, it gave it a sturdy base to straight stitch the bias tape down on. I stitched on both sides as close to the edges as I could get. I did all the lines going one way and then went back and did it going the other direction. This takes a surprising amount of bias tape, so be prepared!

Here you see a pic of the back once this process was done. Pretty satisfying 🙂

I quilted up a backing panel and added a zipper for closure. This ended up as a 16” pillow. As I said before, this would make the cutest table runner and place mats!
Now I've joined the plaid revolution in the quilting world!
Happy Sunday, everyone,
Krista
P.S. I will be teaching two two-day workshops at Chestnut Ridge Sewing in Millersburg, OH, next month!
You can choose Lollipops and Licorice or Winter Visit. The first two days are Sept 15th-16th, and the second two days are Sept. 17th- 18th. I will be teaching both patterns in each class, so you choose the dates that work best for you! I would love to have you in class :)
To join Sept 15th & 16th:
To join Sept 17th & 18th:
Hope to see you there!
Follow all my quilty adventures on Instagram, Facebook, and Pinterest. Visit my YouTube channel for free tutorials and tips. If you like my patterns, you can buy them on Etsy, and here on the website.


