

A Little of This and a Little of That!
- Krista Moser

- Dec 21, 2025
- 3 min read

How about a cute way to put those orphan blocks to use?! I've seen some pretty terrific stockings that are a hodgepodge of leftover orphan blocks and scraps of all kinds.

This week, I thought I would try one myself since I have no shortage of scraps! Haha! It was a really fun process, and I thought I would share my own twist with added dimensional bits tucked in here and there.

I decided to do this in a quilt-as-you-go style to eliminate the need for quilting it once it was pieced. First, I drew a stocking outline on a piece of batting. You can download my stocking template here.

My centerpiece was a small Christmas-themed sample block I made for a project last year and never used. I pinned that in place on the neck of the stocking outline.


I needed to do a little quilting to secure the Christmas block to the batting because it was too big to leave unquilted. This is where a walking foot comes in handy. I stitched cross-lines on either side of the seams of the star for a decorative look.


Now to add the scraps! Building out from the star, I added little strips in different widths. I cut each one just longer than the spot it was going to fill. Lay the strip face down along the edge of the block and pin through all the layers.


Stitch the strip in place through all the layers and press it to the outside.

Add the next scrap strip to another side of the block. Repeat the stitching and pressing process.

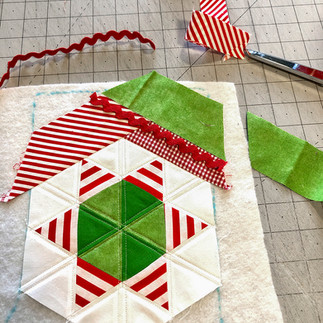


I kept building the stocking front, strip by strip, to fill in the stocking outline above the block. For the next round, I added a piece of rick-rack tucked in the seam. I stitched the rick-rack down first, then went over the top of it with the green strip covering the first stitch line.

You'll want to be generous with your coverage of the area. I made sure there were plenty of scraps to trim off around the blue outline.


As I filled up the space at the bottom part of the stocking, I thought it would be fun to add a few little prairie points! I cut three 2” squares and pressed them in half diagonally, then folded those triangles in half once more to create smaller triangles.


I lined these up together along one raw edge, tucking each one into the last one to overlap them a little. Stitch them in place with a scant ¼” seam, then add the scrap strip over the top and stitch with a full ¼” seam to cover the original stitch line.

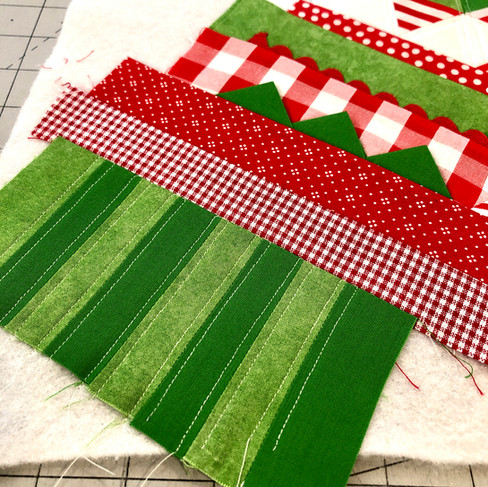


Finally, at the very toe of the stocking, I made a little striped set out of the green fabrics and stitched it down as one unit. I then topstitched along each seam in the same way as I had done the star block. Here you see the back of the batting and all the stitch lines holding the strips and pieces in place. This is why it is called "quilt as you go", everything is secured in place at this point.

You can hardly tell where the edges of the stocking outline are from the front! As I said, you want plenty of margin with all those scrap strips around the edges.


I gave it one final press and turned it over to cut out my stocking shape. I used the original template and lined it up with the shadow of the drawn line from the front. Once it’s all trimmed, it looks quite cute!

I made a fabric loop in the same way as double-fold bias tape (another little scrap strip used!). I also quilted a backing panel out of some sweet Christmas dot fabric.

Tuck the raw ends of the fabric loop into the side seam towards the top back of the stocking, between the front and back panel. Stitch all the way around the stocking, leaving the top edge open.

Cut two more mirror-image lining pieces using the stocking template and stitch those to each other, leaving the top edge open. Tuck the lining into the stocking with wrong sides together, pin, and stay stitch around the top edge, securing all layers together.

I used one more little scrap strip to create a binding for the top edge. I stitched it to the inside first and wrapped it around to the outside to topstitch it into place.
And, there it is! Another orphan block found a home and took a bunch of scraps with it.
🙂
Merry Christmas, everyone!
Krista
Follow all my quilty adventures on Instagram, Facebook, and Pinterest. Visit my YouTube channel for free tutorials and tips. If you like my patterns, you can buy them on Etsy and here on the website.


