One Block, Two Designs!
- Krista Moser

- Feb 5, 2023
- 2 min read
Last week, I showed you how to use striped fabric to make a fun new block. This week, I'll show you what I did with those blocks!

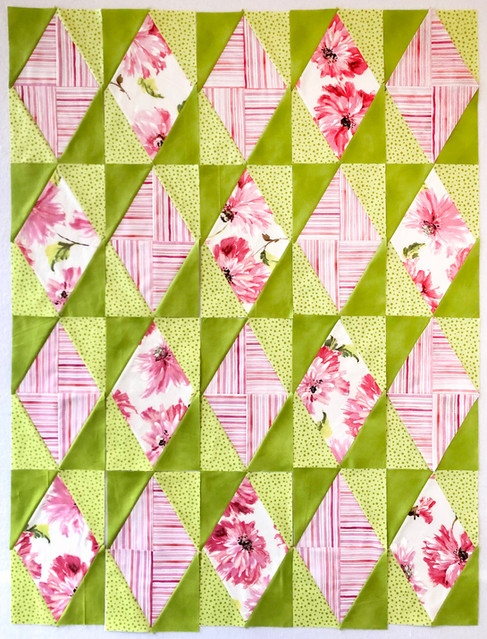
Here is my Stripey Diamonds quilt. It's a simple block concept that you can use to make some very different-looking quilts depending on the size you make and the colors you choose.
We filmed a new YouTube video so I could show you how I made those diamond blocks, from last week's blog, into rectangle blocks with the addition of a companion print and some corner unit accent colors. Just watch how easy this is!


It's fun to see how different the arrangement of these blocks looks when you slide every other row up by half a block. These smaller blocks, made from 4½” diamonds, measure 5” x 8½” when finished.

I made 15 blocks for the checkerboard layout and added five half blocks to fill in the top and bottom edges when I changed to the lattice layout.


The 6½” diamonds worked up into blocks that measure 7” x 12½” when finished. I made 20 blocks for the checkerboard layout and 18 for the lattice layout with four half blocks for the top and bottom edges. I added a 1½” pink border and a 6½” floral border because I wanted to scallop the edge for a super girly look 🙂.

The corner wedge triangles are cut using the same dimensions as the stripey diamond blocks from last week's blog. Here's a link to an infographic, we did a while back, that will show you how many diamonds you can cut from different-sized strips. If you want to dig into your stash and stripes, this might help you make a plan for using what you have!
Happy Sunday everyone,
Krista
Follow all my quilty adventures on Instagram, Facebook, and Pinterest. Visit my Youtube channel for free tutorials and tips. If you like my patterns, you can buy them on Etsy, and here on the website. If you're looking for fabric kits, you can find them here.